5 Tips to Improve Your Home Recordings
1. Get a Preamp
Plugging a guitar or a microphone directly into your recording interface can often produce a very transparent sound that lacks the warmth and volume that a great track surely requires.
Hence we recommend you to plug the guitar or microphone into a preamp first.
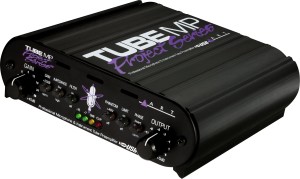
A decent preamp one can be obtained for as little as Rs.3000 and will immediately add volume and warmth to everything that you record.
A few technical things to note:
- First, if you buy a tube preamp, it’s best to junk the tube that comes with it and replace it with a better one (doing so requires nothing more than a screwdriver) which you can buy at a guitar shop.
- Secondly, keep in mind that the output of the preamp will require a balanced audio cable such as an XLR cable. Don’t try and connect the preamp to your interface with just an instrument cable, even though it will fit into the input.
2. Drive In And Constantly use the Web as a Resource
Trial and error is the best teacher.
Most contemporary recording software programs, like GarageBand, are very user friendly and don’t require a lot of time to learn at a basic level. Just start experimenting, and develop your own base knowledge. Once you’ve done this experimentation, then it’s time to use the web to learn specific tasks.
On this audio blog, we provide oceans of tutorials and advice on virtually every topic with respect to recording. Maybe you’ve learned how to record drums fairly well on your own, but you are not sure how to properly EQ a snare drum. Go look it up. Maybe you have recorded a good vocal track but you’d like to know a little bit more about using pitch correction effectively? Seek and you shall find. I continue to learn new methods this approach.
Again, don’t try and take in all of this information at once. It will overwhelm you and make the task of engineering great tracks seem impossible. Advanced books and the like are actually more useful after you’ve gotten a lot of hours under your belt, not before.
3. Invest in One Good Diaphragm Condenser Microphone
We strongly recommend that anyone mastering their own recordings, make purchasing a large diaphragm condenser microphone mandatory. The reason we believe in this item so dearly is that in addition to recording vocals, you can also record acoustic instruments (acoustic guitars, banjos, etc.), light percussion (tambourines, bongos, etc.), and a whole host of other things.
We also love to use ours as a room microphone when recording drums. If you start buying separate condenser microphones of various shapes and sizes for all of these different tasks then your wallet is going to take a beating, and the results really won’t change all that much.
The Rode NT1A, is our widely used microphone. 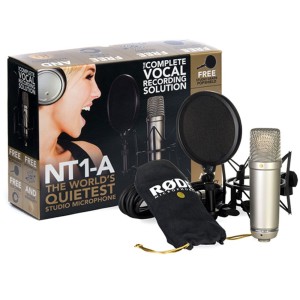 But if you want to stay under Rs.12,000 there are plenty of excellent options out there.
4. Invest in Some Good Mastering Software
One thing that virtually any new home recording enthusiast inevitably says is, “my track is done, but it’s not as loud or punchy as my favorite band’s tunes are.”
Many folks will then turn to professional engineers to master their finished songs. While these consultants often do great work (at increasingly cheap rates), it is no longer required that artists use them.
Nowadays, mastering software is inexpensive, user-
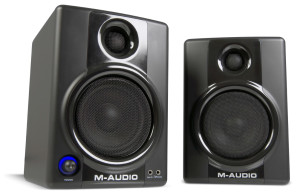
5. Get Decent Monitors
These inexpensive M-
The only important thing is to simply know the characteristics of your monitors compared to other speakers.
Listen to your tracks (as well as commercial recordings) on headphones, car stereos, and cheap computer speakers and compare what you hear to the sound profile of your monitors. Maybe your monitors don’t project certain frequencies especially well so you know to turn those up a little bit when mixing. It is really no more complicated than that. If you follow this rule your tracks will be just as well mixed as the guy or gal who is using an exceptionally expensive monitoring system.